🤖 Coding Agents
- 🤖 pi.dev | Claude alternative
- 🤖 pi.dev | Unity3D
- 🤖 Architectural Comparison: Agent Runtime vs. Single-Shot LLM Execution
- 🤖 Qwen Coder Workflow
- 🤖 Qwen3.6 Local agent test cases
- 🤖 Gemma4 MTP Performance
🤖 pi.dev | Claude alternative
1. Follow this page to install:
2. Install extension: Pi Coding Agent
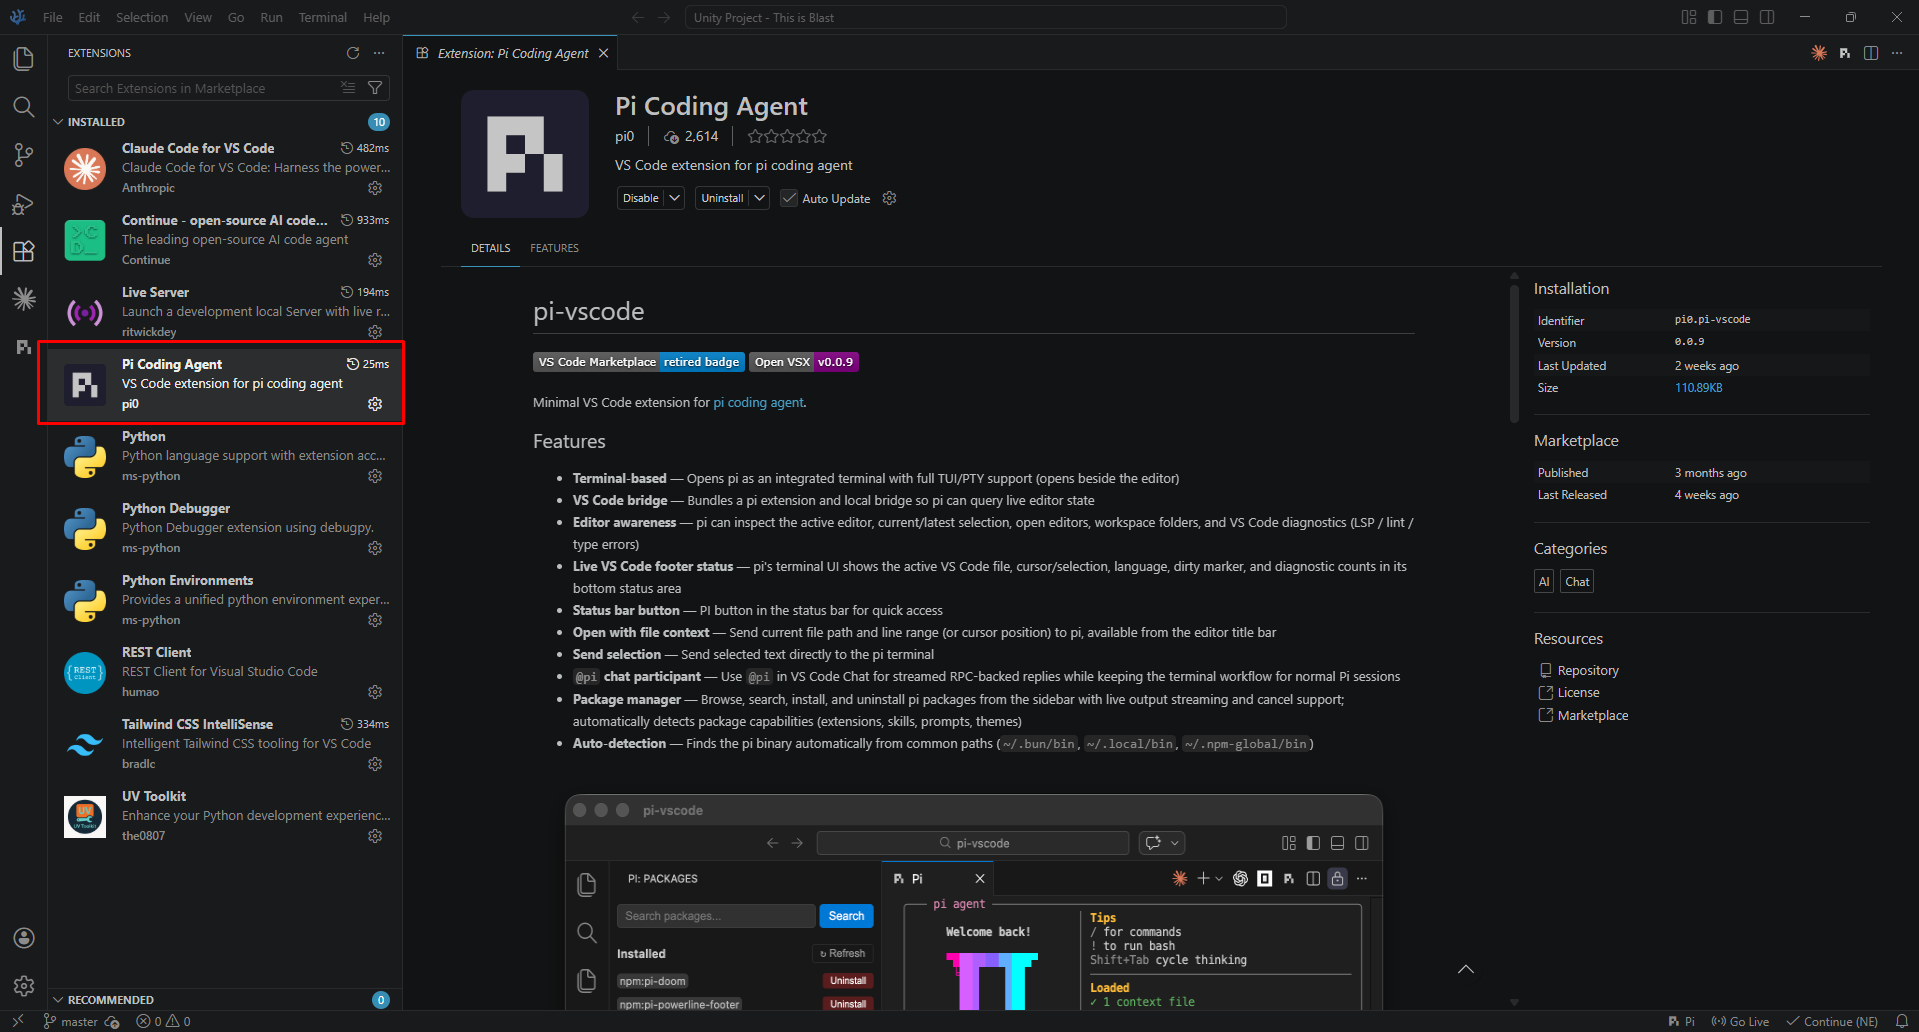
3. Connect to hosted llm service:
- Edit file: "C:\Users\helloworld\.pi\agent\models.json"
{
"providers": {
"llama-cpp": {
"baseUrl": "http://localhost:8888/v1",
"api": "openai-completions",
"apiKey": "none",
"compat": {
"supportsDeveloperRole": false
},
"models": [
{
"id": "unsloth/gemma-4-E2B-it-GGUF:Q4_K_M",
"input": [
"text",
"image"
],
"contextWindow": 131072,
"maxTokens": 32000,
"reasoning": true
}
]
}
}
}
⚠️ Important: Do not using Ollama because tool calling is buggy and not stable for coding agent. Use llama.cpp / vllm / sglang for best compatibility and performance.
4. Select model and go
- Open vscode or codium, then press Ctrl + Shift + T
- Type: Pi Open

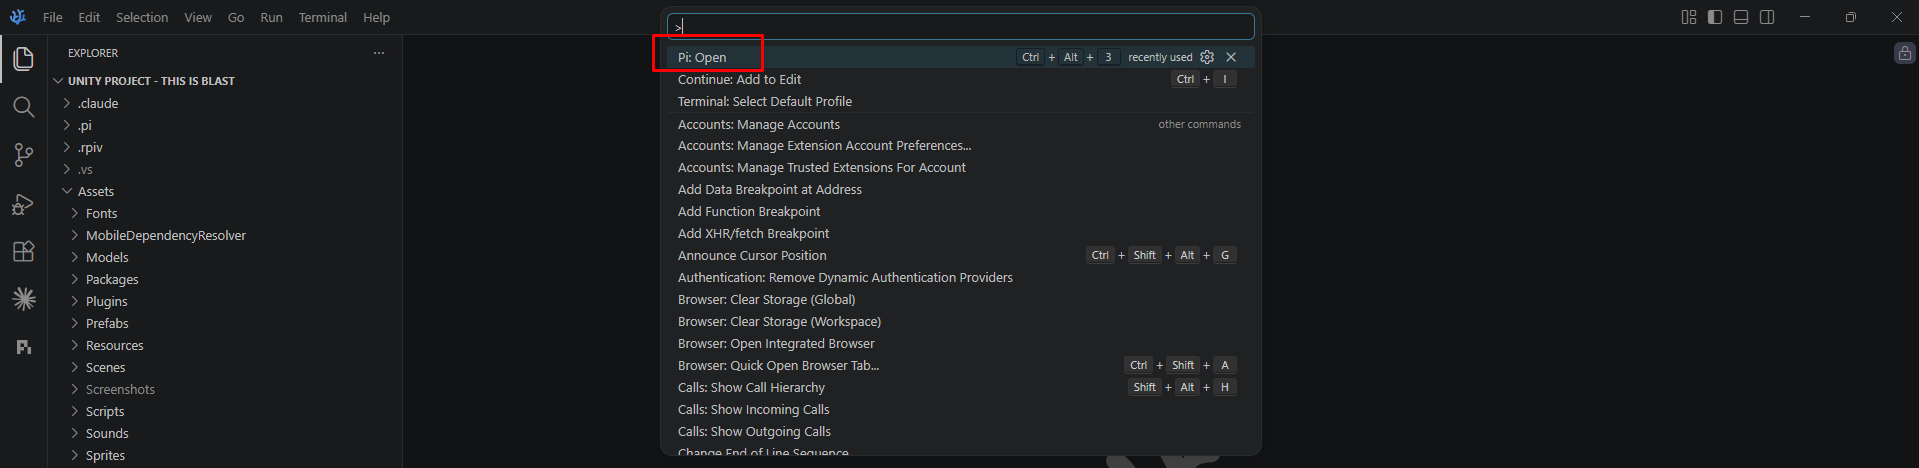
/model # select model
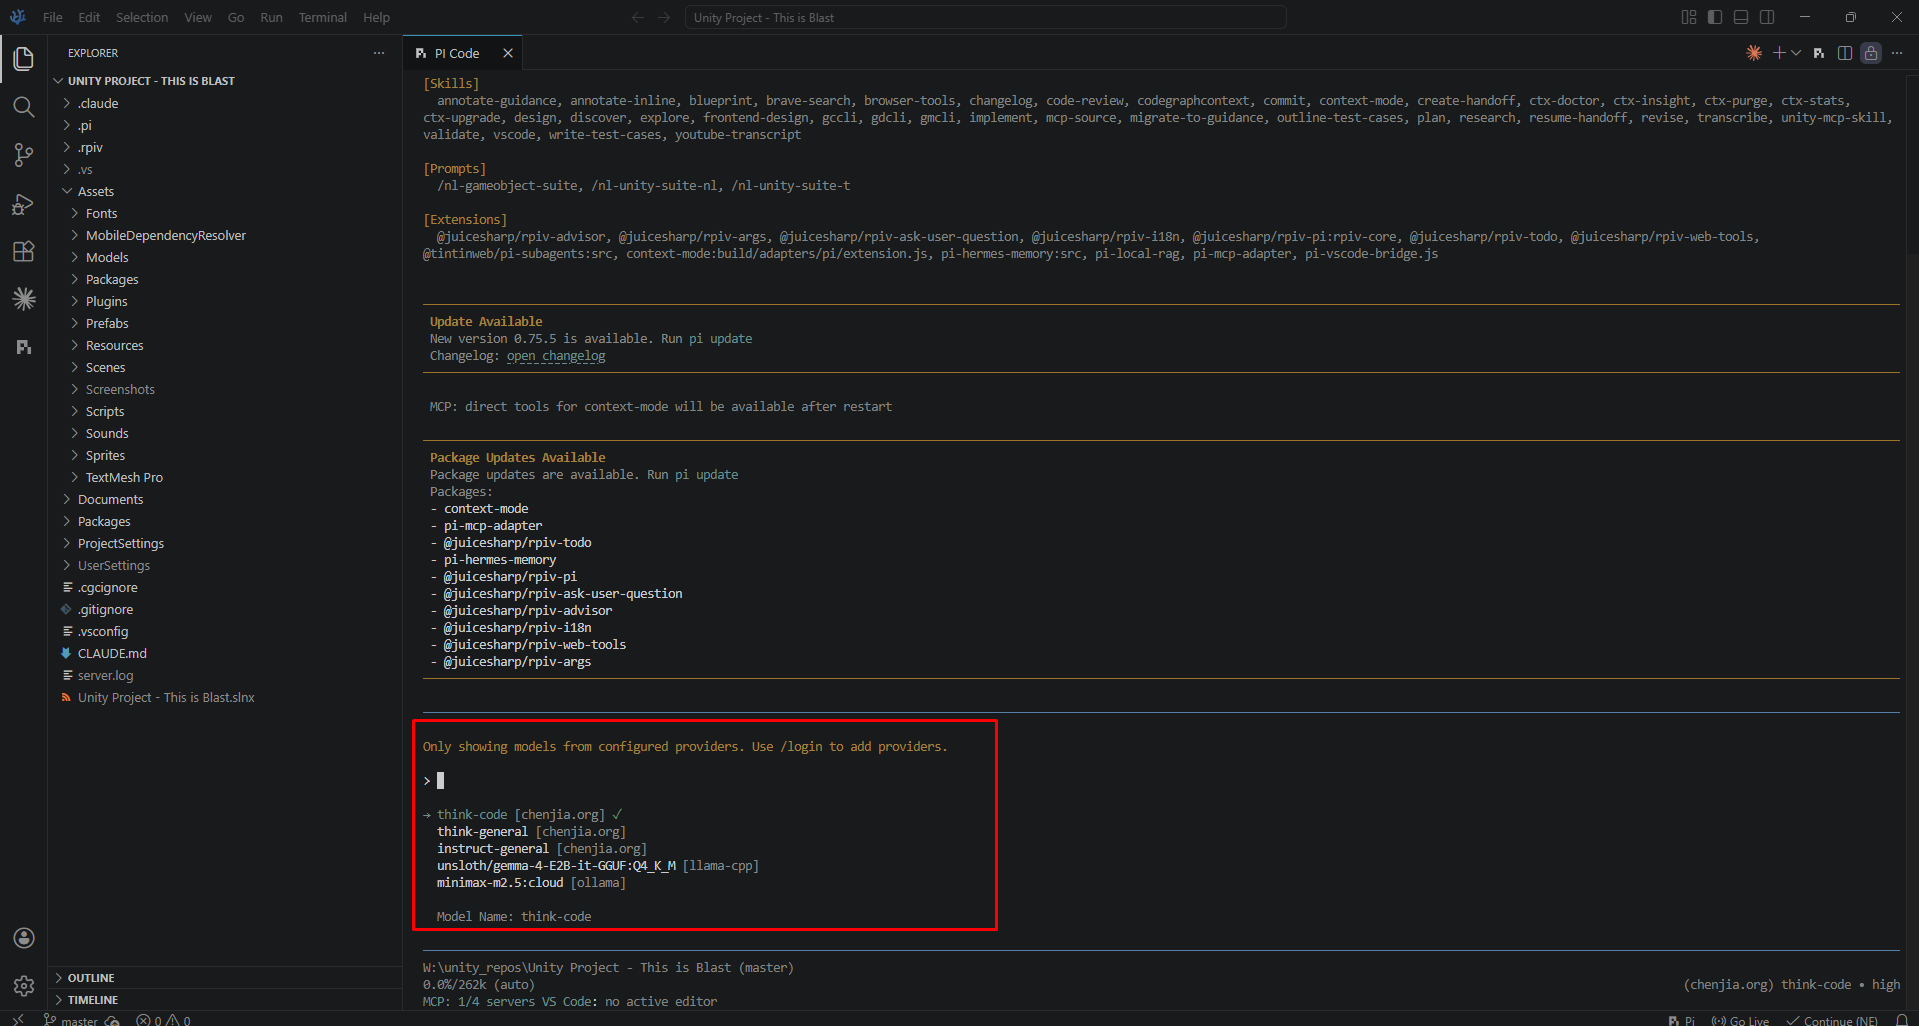
5. Recommend models
🤖 pi.dev | Unity3D
Demo

Quick Start
Install (Follow Official Instruction)
Connect MCP: You have to click Install Skills first.

Clone Skills: Copy all contents inside .claude to .pi

Enjoy: Click start server, the extension Pi.dev connect to MCP server automatically.

🤖 Architectural Comparison: Agent Runtime vs. Single-Shot LLM Execution
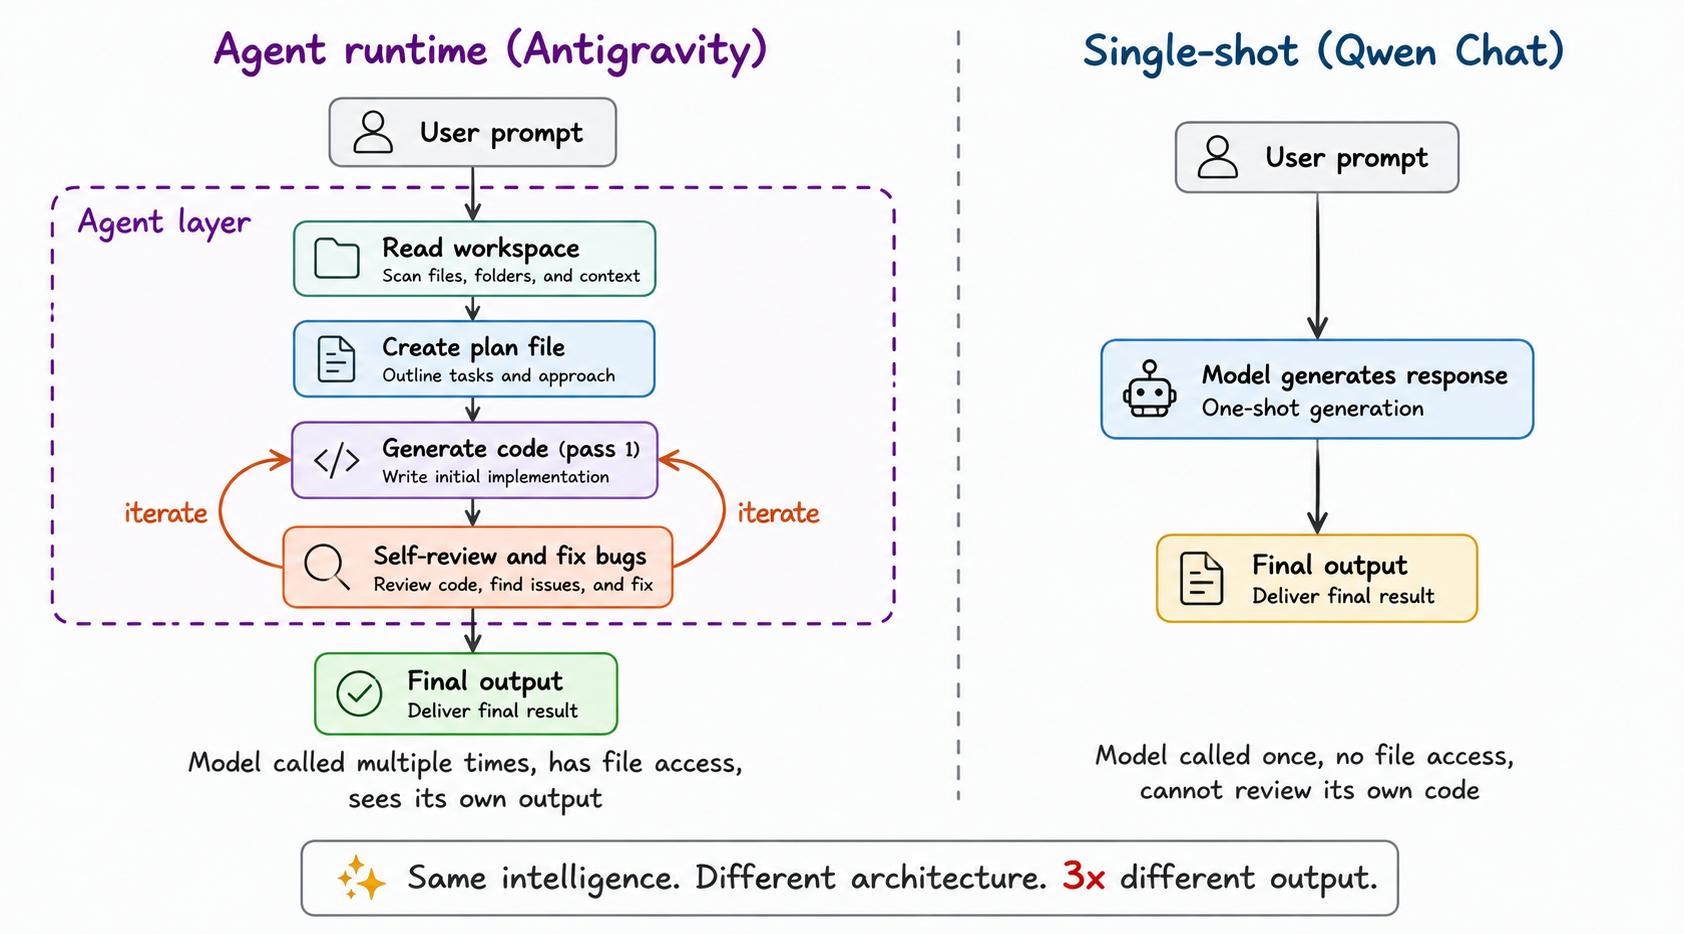
Core Insight: Same intelligence. Different architecture. 3x different output.
1. Overview of the Architectures
🤖 Architecture A: Agent Runtime (Antigravity)
An iterative, multi-step system where the LLM is embedded within a programmatic control loop (the "Agent layer"). It mimics a human software engineering workflow by breaking tasks down and self-correcting.
-
Workflow Flowchart:
User prompt➔Read workspace➔Create plan file➔Generate code (pass 1)➔Self-review & fix bugs (Iterate)➔Final output -
Key Capabilities:
- Multi-turn Invocation: The model is called multiple times throughout the execution cycle.
- Workspace Awareness: Has active file access to read existing codebases and context.
- Feedback Loops: Uses a self-correction mechanism to iterate on code generation and bug fixing before finalizing.
⚡ Architecture B: Single-Shot (Qwen Chat)
A traditional, direct input-output interaction model typical of standard chat interfaces.
-
Workflow Flowchart:
User prompt➔Model generates response➔Final output -
Key Capabilities:
- Single-turn Invocation: The model is called exactly once per request.
- Isolated Environment: No system file access or workspace context awareness.
- Static Generation: Cannot review, test, or self-correct its own code prior to outputting.
2. Comparative Analysis
| Dimension | Agent Runtime (Antigravity) | Single-Shot (Qwen Chat) |
|---|---|---|
| Model Invocations | Multiple times per task (Iterative) | Single time per task (Linear) |
| Context Integration | High (Reads & updates workspace files) | Low (Limited to the immediate prompt) |
| Self-Correction | Yes (Autonomous test, review, and edit) | No (Output is final on the first pass) |
| Computational Cost | High (Multi-token, multi-turn overhead) | Low (Single generation cost) |
| Output Quality | Significantly higher (3x improvement) | Baseline model capability |
3. Advantages & Disadvantages (Pros & Cons)
🔍 Expand Details: Agent Runtime (Antigravity)
👍 Pros
- Drastically Higher Code Quality: The iterative self-review loop minimizes syntax errors, logical bugs, and edge-case failures, yielding up to 3x better results.
- Contextual Relevance: File system access allows the agent to understand existing project structures, frameworks, and coding standards, leading to highly integrated solutions.
- Autonomy in Planning: Creating an explicit plan file before coding forces the system to map out dependencies and architecture, reducing erratic generation.
- Handling Complexity: Well-suited for large-scale tasks that require multi-file edits or complex refactoring.
👎 Cons
- High Latency: Because it involves multiple internal iterations and self-review steps, the time to return the final output is substantially longer.
- Increased API Costs / Resource Intensive: Multiple model calls and expanded token usage (from reading workspaces and processing logs) significantly drive up computational costs.
- Risk of Infinite Loops: If the self-review mechanism fails to correctly resolve an error, the agent can get stuck iterating indefinitely without human intervention.
🔍 Expand Details: Single-Shot (Qwen Chat)
👍 Pros
- Near-Instantaneous Response: Provides immediate feedback, making it ideal for quick lookups, simple queries, or rapid brainstorming.
- Highly Cost-Effective: Minimizes token utilization and computational overhead by executing only a single pass.
- Simplicity: No specialized software layer or file system integration needed; straightforward plug-and-play architecture.
👎 Cons
- Lower Success Rate on Complex Tasks: Lacks the ability to double-check its work, making it highly prone to hallucinations, bugs, and incomplete code blocks.
- Blind to Project Context: Cannot read local workspaces autonomously; relies entirely on the user manually copying and pasting context into the prompt window.
- Brittle Output: If the first generation contains a minor syntax error, the output is broken, requiring the user to manually prompt it again to fix it.
4. Key Conclusion
Increasing the raw size or intelligence of an underlying foundational model is not the only path to better performance. Programmatically wrapping an existing model in an Agent Runtime structure—granting it execution memory, file access, and self-evaluation capabilities—unlocks vastly superior real-world utility compared to utilizing the exact same model in a Single-shot context.
🤖 Qwen Coder Workflow
🐓 Quick Start
First we need link github repo.
Becareful, this action will grant Qwen access to your repos.

Then we need some markdown files describe how the application working.
Just typing on common language, doesn't need to write technical language.
implement.md
This project is using Python (uv), using gradio with comfyui server to generate images.
If the input / output image too big, set fix-height = 444px
Make sure the web still working if refresh browser.
When running, the Generate button have to changed to Stop button.
The main UI defined on main.py and contain 2 tabs.
tab1: ZIT.
tab2: Flux2-Klein-9B
to implement:
tab1: zit.md.
tab2: flux2_klein_9b.md
loRA list have collapse function.
this one can add more loRA item.
each loRA has field name, weight and remove button.
if press genegrate button, loRA tag like <name:1.0> will be merge into prompt then send. (but without see on prompt field).
flux2_klein_9b.md
This document describe the Flux module (Flux2-Klein-9B) working.
File structure:
1. views/flux2_klein_9b_view.py
2. workers/flux2_klein_9b_worker.py
flux2_klein_9b_view: The gradio implement UI renderer.
flux2_klein_9b_worker: The code extract from comfyui, support start inference.
# flux2_klein_9b_view layout:
| prompt: helloworld | Generate / Stop button |
| config: seed (with toggle random value), width, height, toggle_ref |
| loRA list (each with enable toggle, name, strength) |
| input_img | output image |
if toggle_ref enabled -> we have 2 input_img.
# flux2_klein_9b_worker:
need modify, remove main block.
rename main function to generate and add config parameters into.
zit.md
This document describe the ZIT module (Z-Image-Turbo) working.
File structure:
1. views/zit_view.py
2. workers/zit_worker.py
zit_view: The gradio package support UI renderer.
zit_worker: The code extract from comfyui, support start inference.
# zit_view layout:
| prompt: helloworld | Generate / Stop button |
| config: seed (with toggle random value), width, height |
| loRA list (each with enable toggle, name, strength) | output image |
# zit_worker:
need modify, remove main block.
rename main function to generate and add config parameters into.
Then using this prompt to start generate code:
Help me implement all the feature, start from implement.md
🐓 Apply the changes
After generation, just click Publish to GitHub, they will create a pull request on GitHub, just merged into.

🐓 Result
If open on Fork (Git Version Control Application) you can see the modification from qwen.ai[bot].

Result is not good at all. You can see the bug on UI, layout is not good as Antigravity (Gemini 3.5 Flash).

Sometime, you need add more files into project.
Qwen Coder cannot detect it automatically and have to prompt that new files is added.

🐓 FREE ?
Yes, at least they're free.
But trigger data protect privacy, grant full access for agent mean the source code, keys, ... is public.
I refer using LiteLLM + vllm to simulate Claude API than this way.
🤖 Qwen3.6 Local agent test cases
Common user GPU only have 8-16G VRAM.
When the model not fully loaded to VRAM, they have to offload into RAM and processing data with CPU.
This cause local AI system super slow, token generation speed only reach 1-5 token/s.
This paper is writing about test cases and looking for the best configuration for self-host agent.
🤖 Hardware System
Mainboard: Asrock A520M/AC
CPU: Ryzen5 5500 (6C/12T)
RAM: 32G DDR4 3200.
GPU: RTX3060 12G VRAM
🤖 Environment
llama.cpp with Qwen3.6-35B-A3B-MTP-GGUF (IQ4_XS).
Then public the API key to use vscode + pi.dev agent.
The point is Qwen3.6-35B is MoE model, this mean we just need some layers loaded into GPU to use.
llama.cpp provide 2 agruments support MoE: --n-cpu-moe and --cpu-moe.
We need to looking for which one is the best one for local LLM agent.
This is my compose to run llama.cpp:
services:
llama-cpp:
image: sandichhuu/llama-cpp:cu132
container_name: llama-cpp
ports:
- 8080:8080
privileged: true
ipc: host
volumes:
- /mnt/data/files/models:/app/models
command: >
-m /app/models/unsloth/Qwen3.6-35B-A3B-MTP-GGUF/Qwen3.6-35B-A3B-UD-IQ4_NL.gguf
--mmproj /app/models/unsloth/Qwen3.6-35B-A3B-MTP-GGUF/mmproj-BF16.gguf
--port 8080 --host 0.0.0.0
-b 4096 -ub 4096
-t 12 -c 262144
--parallel 1 -fa on -ngl 999
--cache-type-k q4_0 --cache-type-v q4_0
--n-cpu-moe 35
--no-context-shift
--no-mmap --direct-io --fit off --jinja --no-cache-prompt --cache-ram 0
deploy:
resources:
reservations:
devices:
- driver: nvidia
count: all
capabilities:
- gpu
restart: unless-stopped
🤖 Test case 1: Use --n-cpu-moe flag
The llama.cpp process consume 16G of RAM and 11G of VRAM.
And graph help understand how it's working.
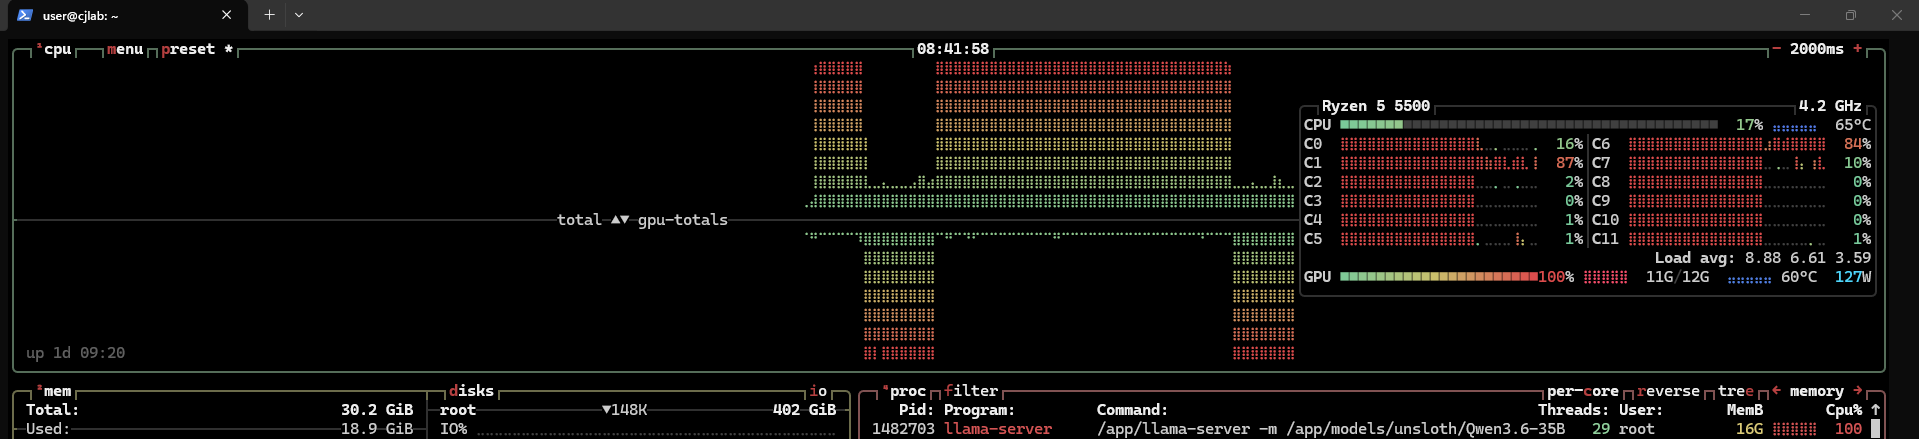
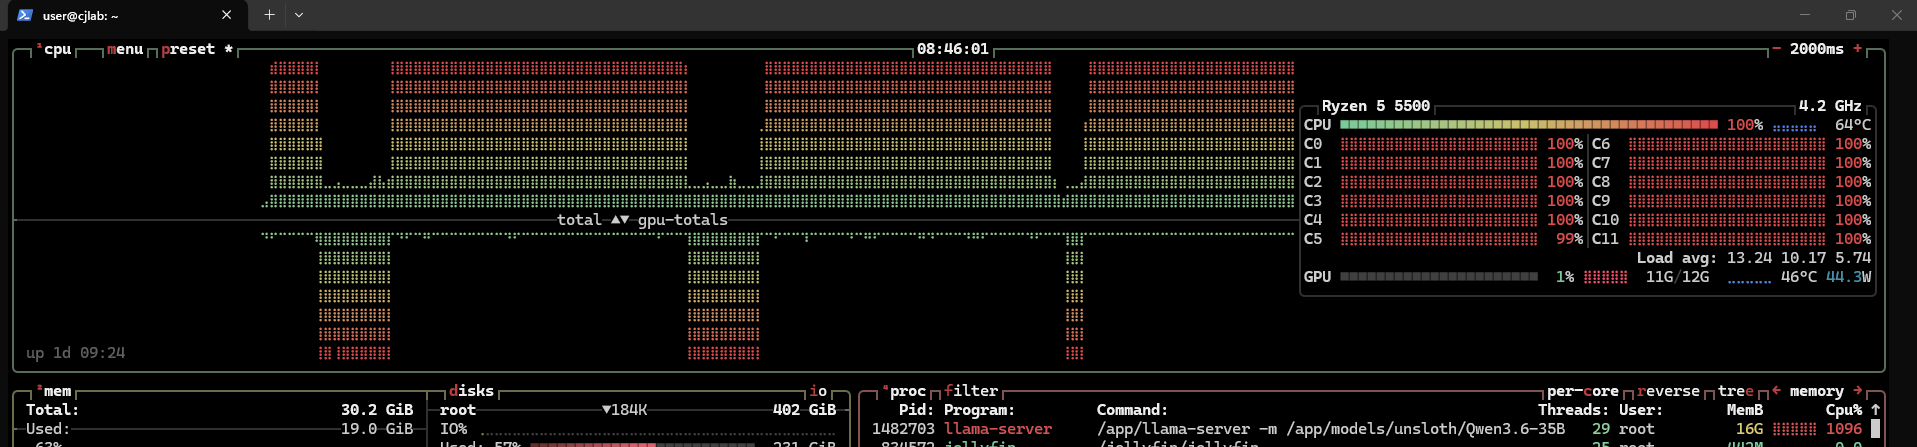
On the case trigger data layers on RAM -> CPU will working, then trigger data layers on VRAM -> GPU will working.
👉 TPS: 14
🤖 Test case 2: Use --cpu-moe
Amazing ! RAM consumption is 18G, but VRAM consumption only 7.3G
The generation is faster and use GPU more than test case 1.
The process still using CPU, but not too much.
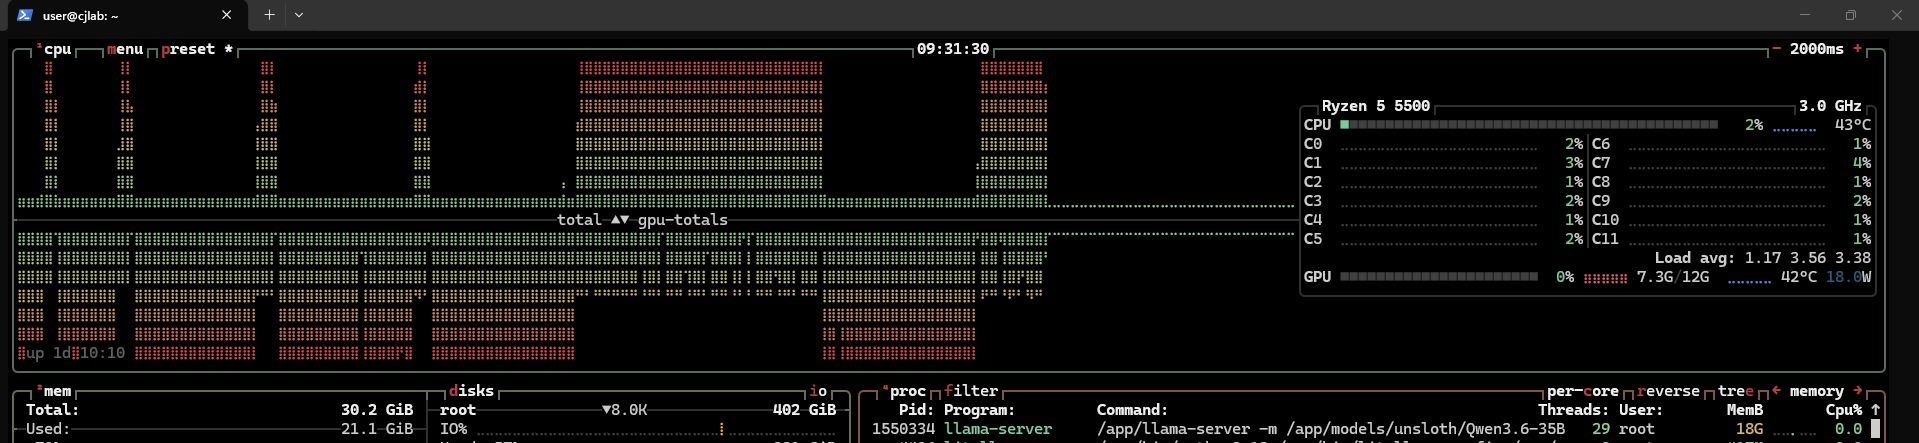
👉 TPS: 31

🤖 Test case 3: Use --cpu-moe with MTP.
Now we known that --cpu-moe and -ngl 999 is the best configuration.
MTP is multi-token prediction, this configuration consumpt more VRAM but the speed is faster.
Let's try out.
- First try: Do not success, OOM error.
I tried set ubatch to 2048. It's runnable but only reaching 30TPS and using CPU 100%, GPU 20%.
Not make sense. Then I research and known that llama.cpp has a bug, they not support MTP for Qwen3.6 35B MoE.
Then I found this llama.cpp fork repo: ik_llama, they fixed this bug.
- Second try: TPS: 30 when using ik_llama, I think this one is more complex to configuration.
🤖 Conclusion:
Now I'm pretty sure that case 2 is the best one.
MTP hit 45-60 tps at start, but they slow down time by times and stable at 30 tps after few seconds.
Final compose version:
services:
llama-cpp:
image: sandichhuu/llama-cpp:cu132
container_name: llama-cpp
ports:
- 8080:8080
privileged: true
ipc: host
volumes:
- /mnt/data/files/models:/app/models
command: >
-m /app/models/unsloth/Qwen3.6-35B-A3B-MTP-GGUF/Qwen3.6-35B-A3B-UD-IQ4_NL.gguf
--mmproj /app/models/unsloth/Qwen3.6-35B-A3B-MTP-GGUF/mmproj-BF16.gguf
--port 8080 --host 0.0.0.0
-b 4096 -ub 4096
-t 12 -c 262144
-fa on --parallel 1
-ctk q4_0 -ctv q4_0
--cpu-moe -ngl 999
--no-mmap --jinja
--cache-ram 0
--no-context-shift
deploy:
resources:
reservations:
devices:
- driver: nvidia
count: all
capabilities:
- gpu
restart: unless-stopped
🤖 Gemma4 MTP Performance
💻 SYSTEM
CPU: Ryzen 5 5500.
RAM: 32G DDR4 3200.
GPU: RTX 3060 12G VRAM.
With MTP: Sometime the tps hit 147 token/s.
Without MTP: Hit 32 token/s.
But MTP is only hit 147 token/s at start. After few seconds, the tps is only 29 token/s.
I think the hardware have no enough VRAM. If all the layers is fully loaded, the TPS can be keep at 147 token/s.
